These notes presume that you have a basic understanding of glitching and of computer 3d modeling.
Instead of using standard 3d modeling tools to modify a shape, we’ll be directly manipulating the data in the file. Sometimes glitch artists employ a hex editor to accomplish this, but since the 3d file format we’re targeting is in ascii text, an ordinary text editor will do.
We’ll be using the Wavefront .obj file format. Models in this format are readily available on the web. However, I recommend that you use the open source modeling and rendering application Blender to either generate your own models or to simplify third party models. Alternately, you can use Meshlab.
In Blender, export the model as an .obj file, but turn off all of the options – UVs, Materials, Normals, etc. etc. In Meshlab you will have similar options when exporting a mesh – we want only the most basic geometric information.
Once you have your file.. use your favorite text editor to open it. I’m currently using Windows, so the editor of choice for me is Notepad++.
In the editor, the file structure becomes easy to parse. The data for a simple cube, created in Blender and exported to .obj looks like this:
# Blender v2.71 (sub 0) OBJ File:
# www.blender.org
v -1.000000 -1.000000 1.000000
v -1.000000 -1.000000 -1.000000
v 1.000000 -1.000000 -1.000000
v 1.000000 -1.000000 1.000000
v -1.000000 1.000000 1.000000
v -1.000000 1.000000 -1.000000
v 1.000000 1.000000 -1.000000
v 1.000000 1.000000 1.000000
f 5 6 2 1
f 6 7 3 2
f 7 8 4 3
f 8 5 1 4
f 1 2 3 4
f 8 7 6 5
There’s no real header.. the part at the beginning is made up of notes, indicated by # signs.. the system disregards these. Next comes a list of vertices.. one for each line that begins with a “v”. Each of those lines contain three values for the x, y, z position of the vertex relative to the origin. The meaning of the scale may vary depending on the settings of the program you use. Blender typically operates in “Blender Units” . Our example is two Blender units along each edge (the distance from -1 to 0 and from 0 to 1), so a cube half the dimension of our example might have a vertex at position -0.5 -0.5 0.5
Next comes a list of polygons, referred to as “faces”, one on each line that begins with an “f”. In our example the faces are quads since they have four integer values, each integer indicating a vertex from the first part of the file. The integer corresponds to the index of the vertex. For example, the first quad of our cube is made up of the 5th, 6th, 2nd, and 1st vertices in the list. This structure will have important consequences when we begin to “glitch” the data.
We’ll first consider glitching the vertex data. One way to do this is to cut and paste. This changes the index of each vertex. The result is that some of the faces in the second part of the file no longer refer to the same vertices they did originally. Usually this means that the “glitched” form stays fairly close to the general outline of the original object.. we have all the same vertices – there are no vertices that have moved to new positions outside of the original object.. but the faces may be scrambled in curious ways. Note the following progression:
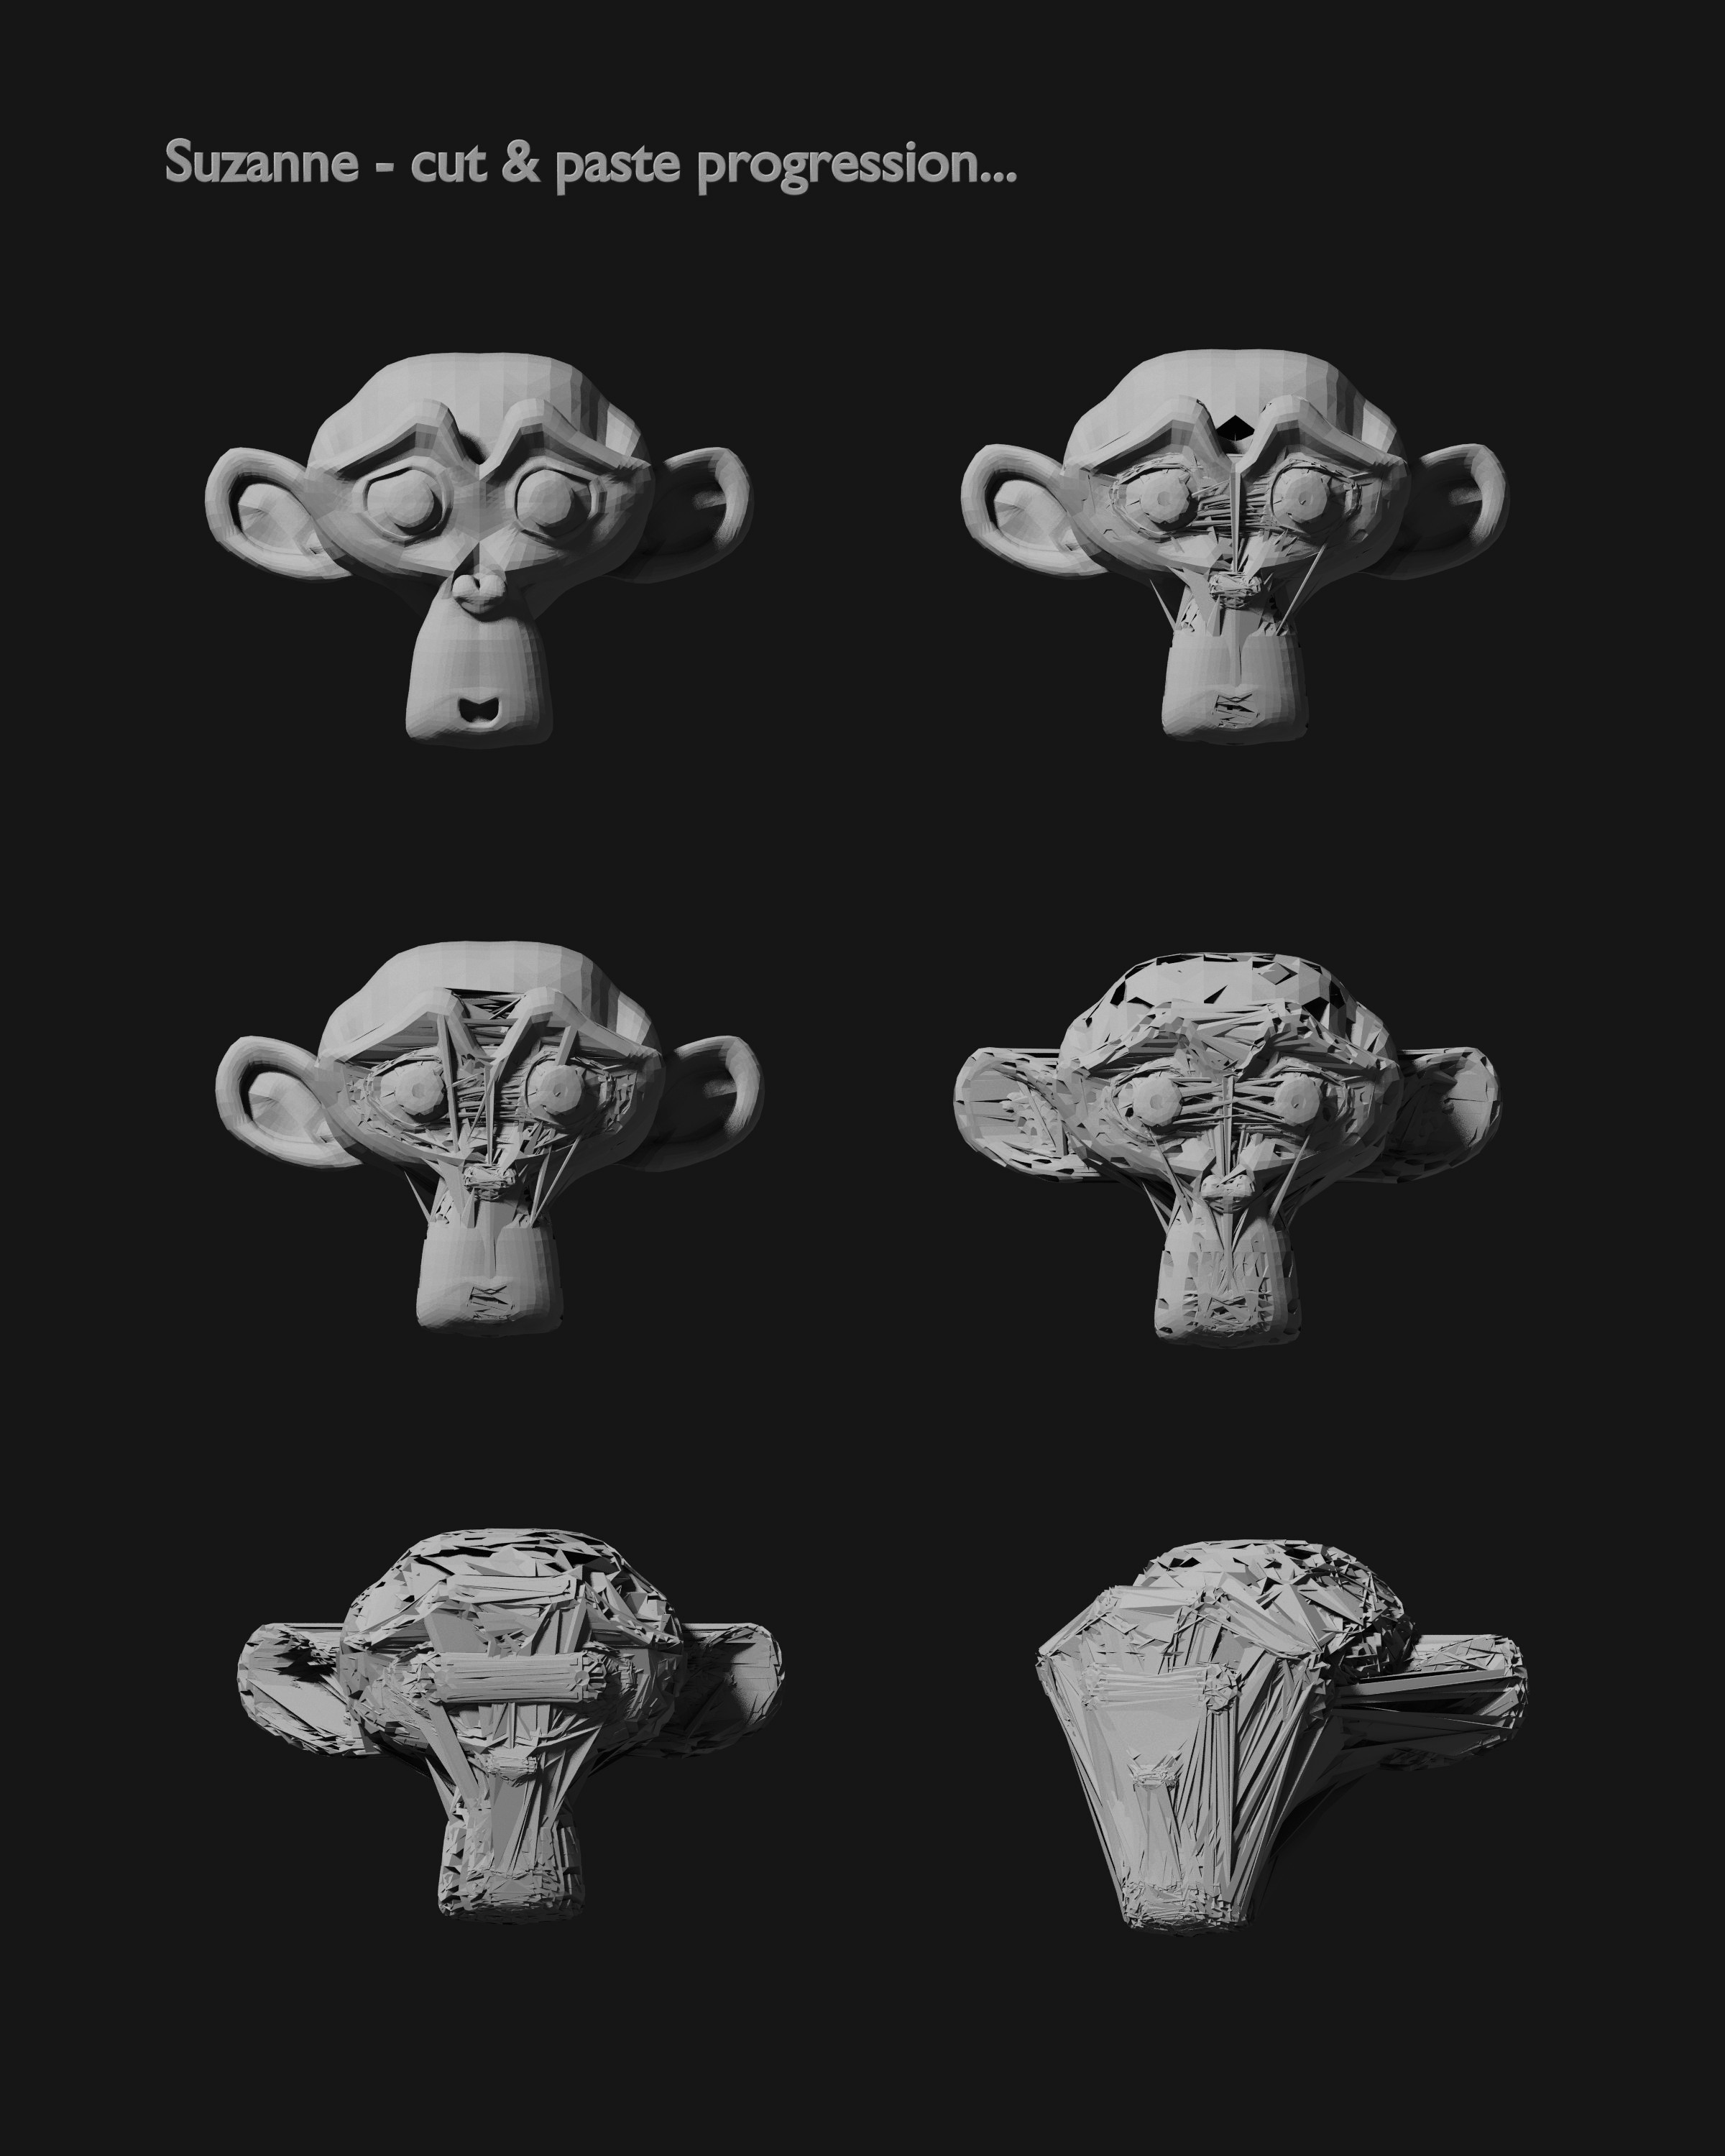
We’re using the famous Blender “Suzanne” monkey head as our model. Successive versions represents more drastic applications of cut and paste. At the beginning we use smaller snippets and paste them at positions that are closer to their original location. Later in the series we cut bigger chunks and paste them much farther away from their original location.
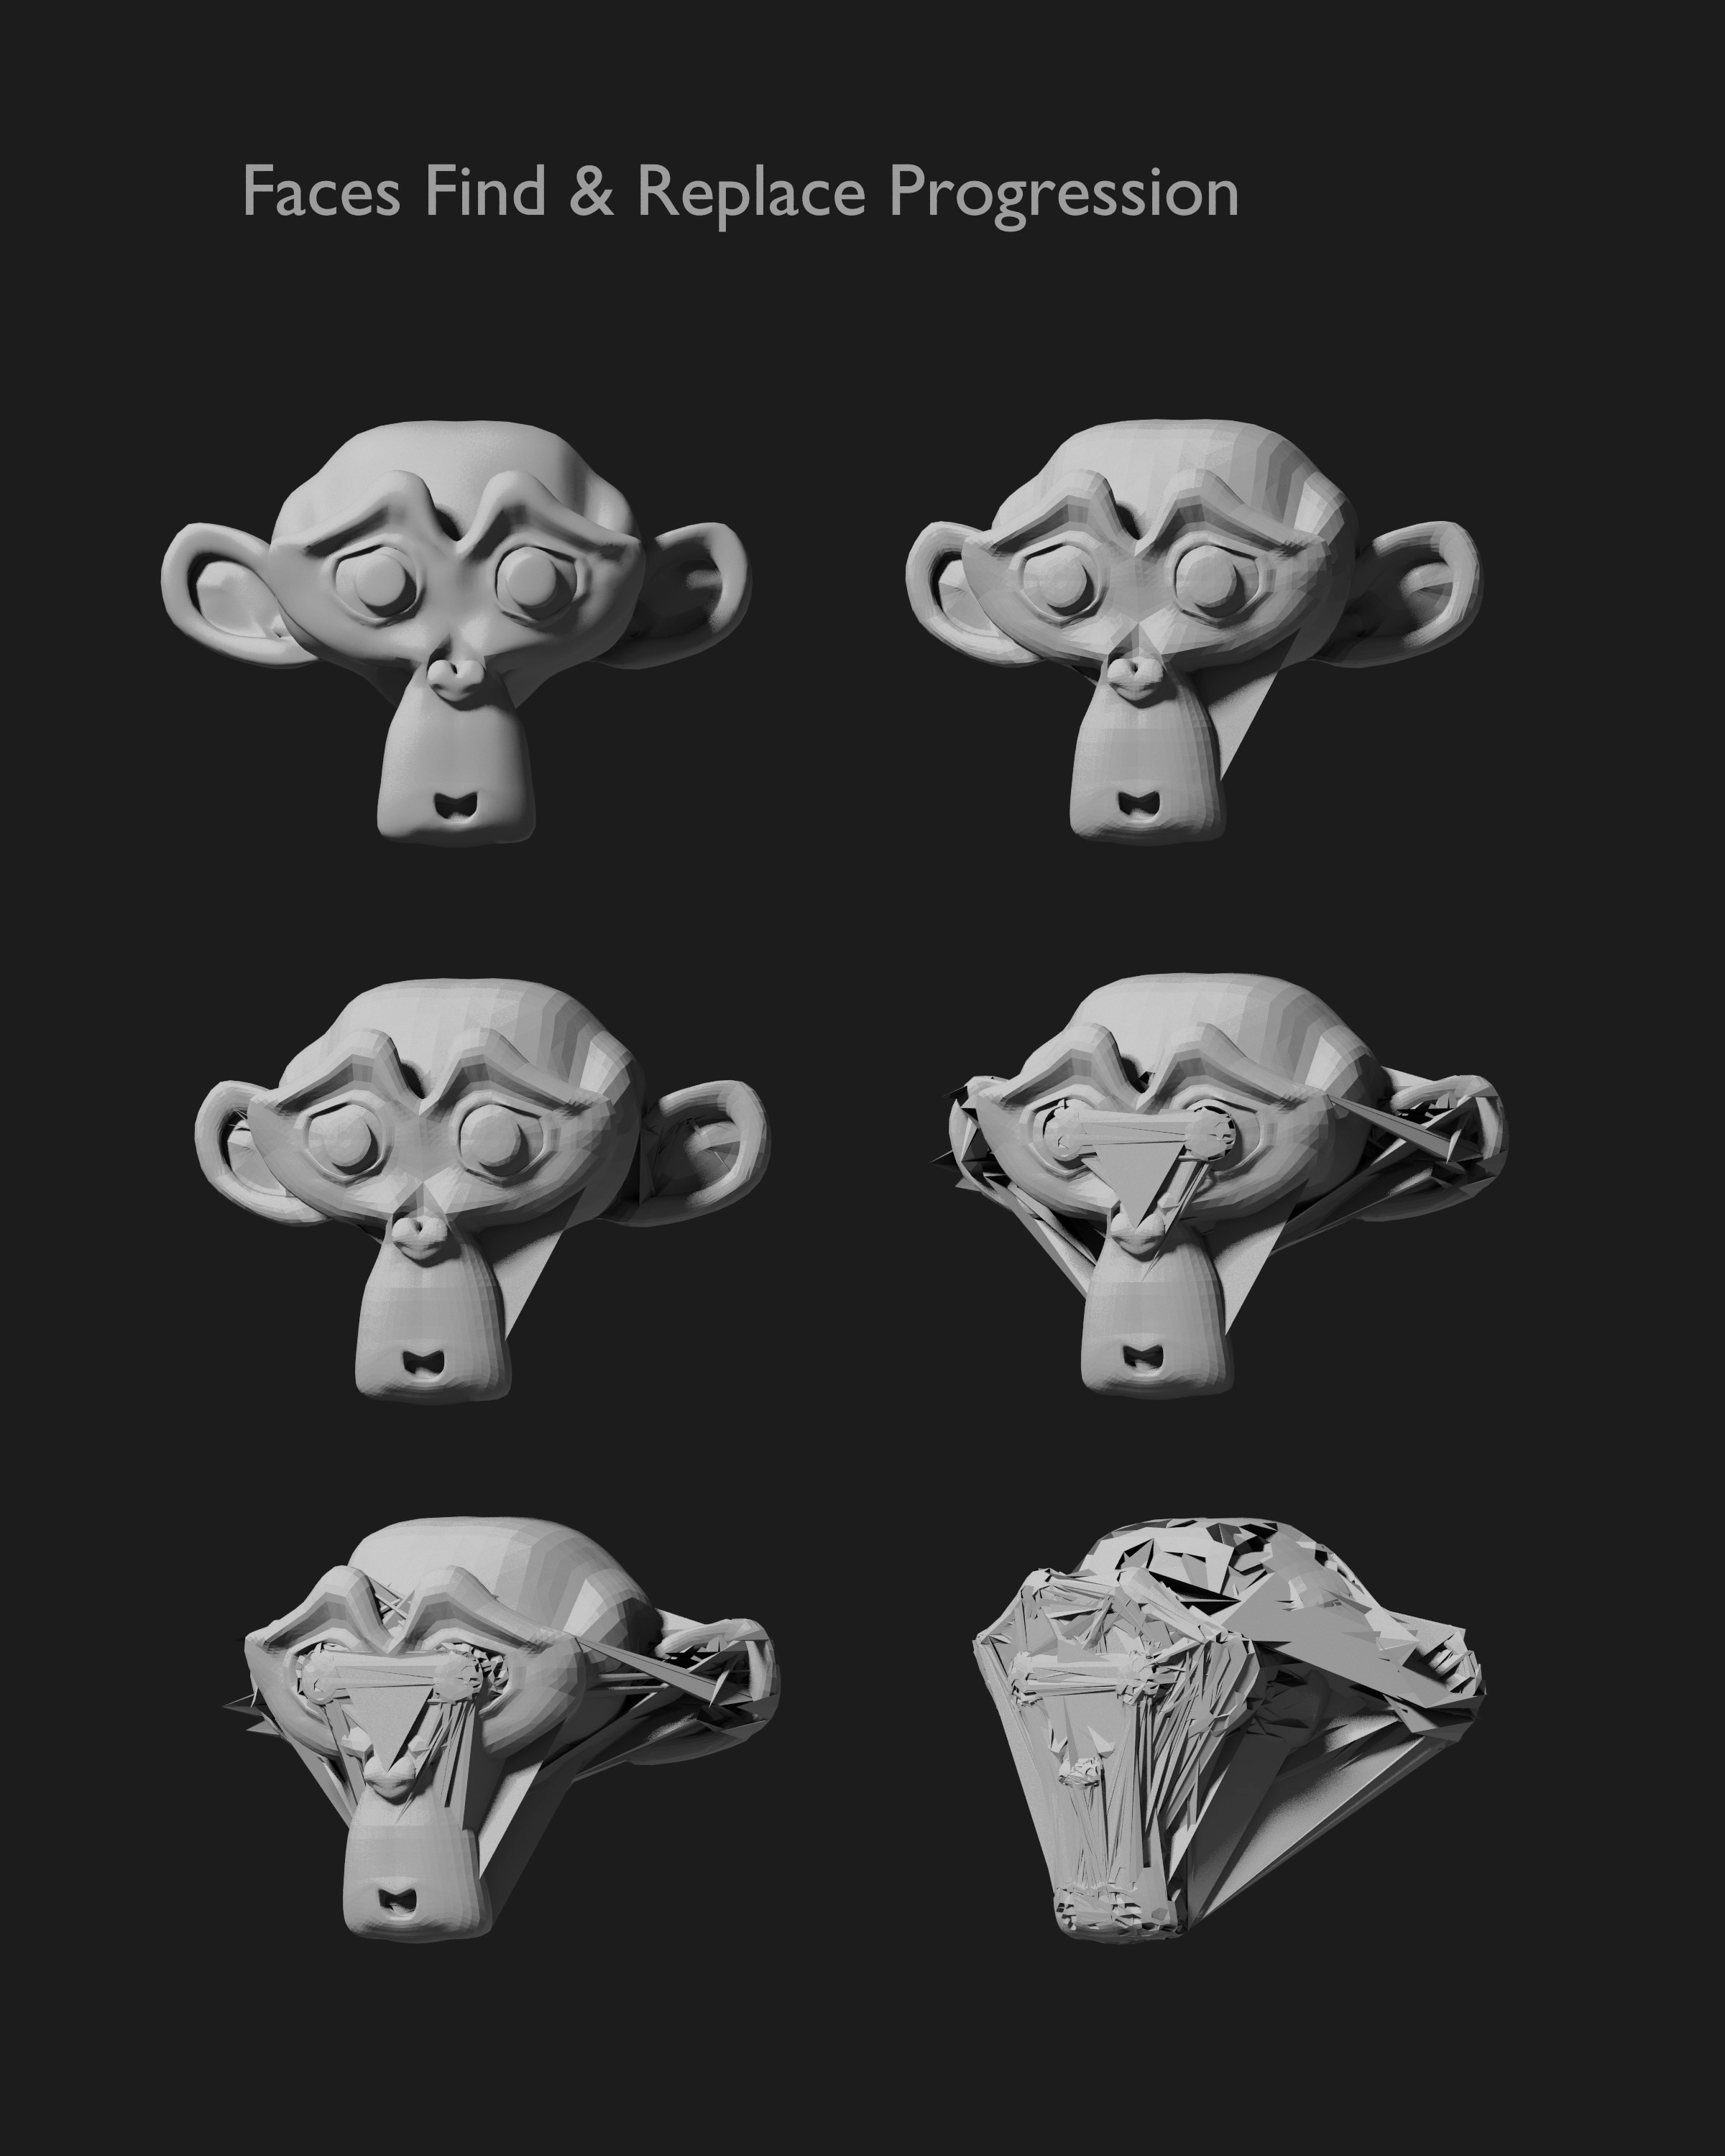
Another option is to use “Find and Replace” within the list of vertices. For example, one could search for all instances of “1” and replace it with “8”. This may result in more dramatic reshaping of the model. For example, a vertex that was originally at x axis -1.0000 would now be at x axis -8.0000 . That would mean that the vertex is now eight times further from the origin than its original position. Also, one might replace negatives with positives and vice versa. This would result in a displacement of the vertex in a direction opposite of its original position relative to the origin. See the following examples… again there is a progression from smaller changes to more dramatic ones.. starting out with find and replace over small subsets of the vertices and smaller differences between the number being replaced and the number replacing it. Toward the end, search and replace occurs over a wider span of the vertices and there are greater differences between the originals and the replacements:
Note that replacing a larger number with a smaller number generally results in a vertex that is inset.. that moves closer to the origin (assuming that the origin is at the center of the object.) For example, if we replace “8” with “2”, a vertex that was at Y axis -0.8 is now at -0.2, and a vertex that was at Y axis 0.8 will now be at 0.2 – in both the negative and the positive case the vertex ends up closer to the origin. Conversely, replacing a smaller number with a larger results in vertices that are farther away from the origin.
Another option is to change the part of the list that contains data for the faces. Cutting and pasting whole lines for each face will not have any effect.. it doesn’t matter what order the faces are in! If they refer to the same vertices they did before they will look exactly the same.
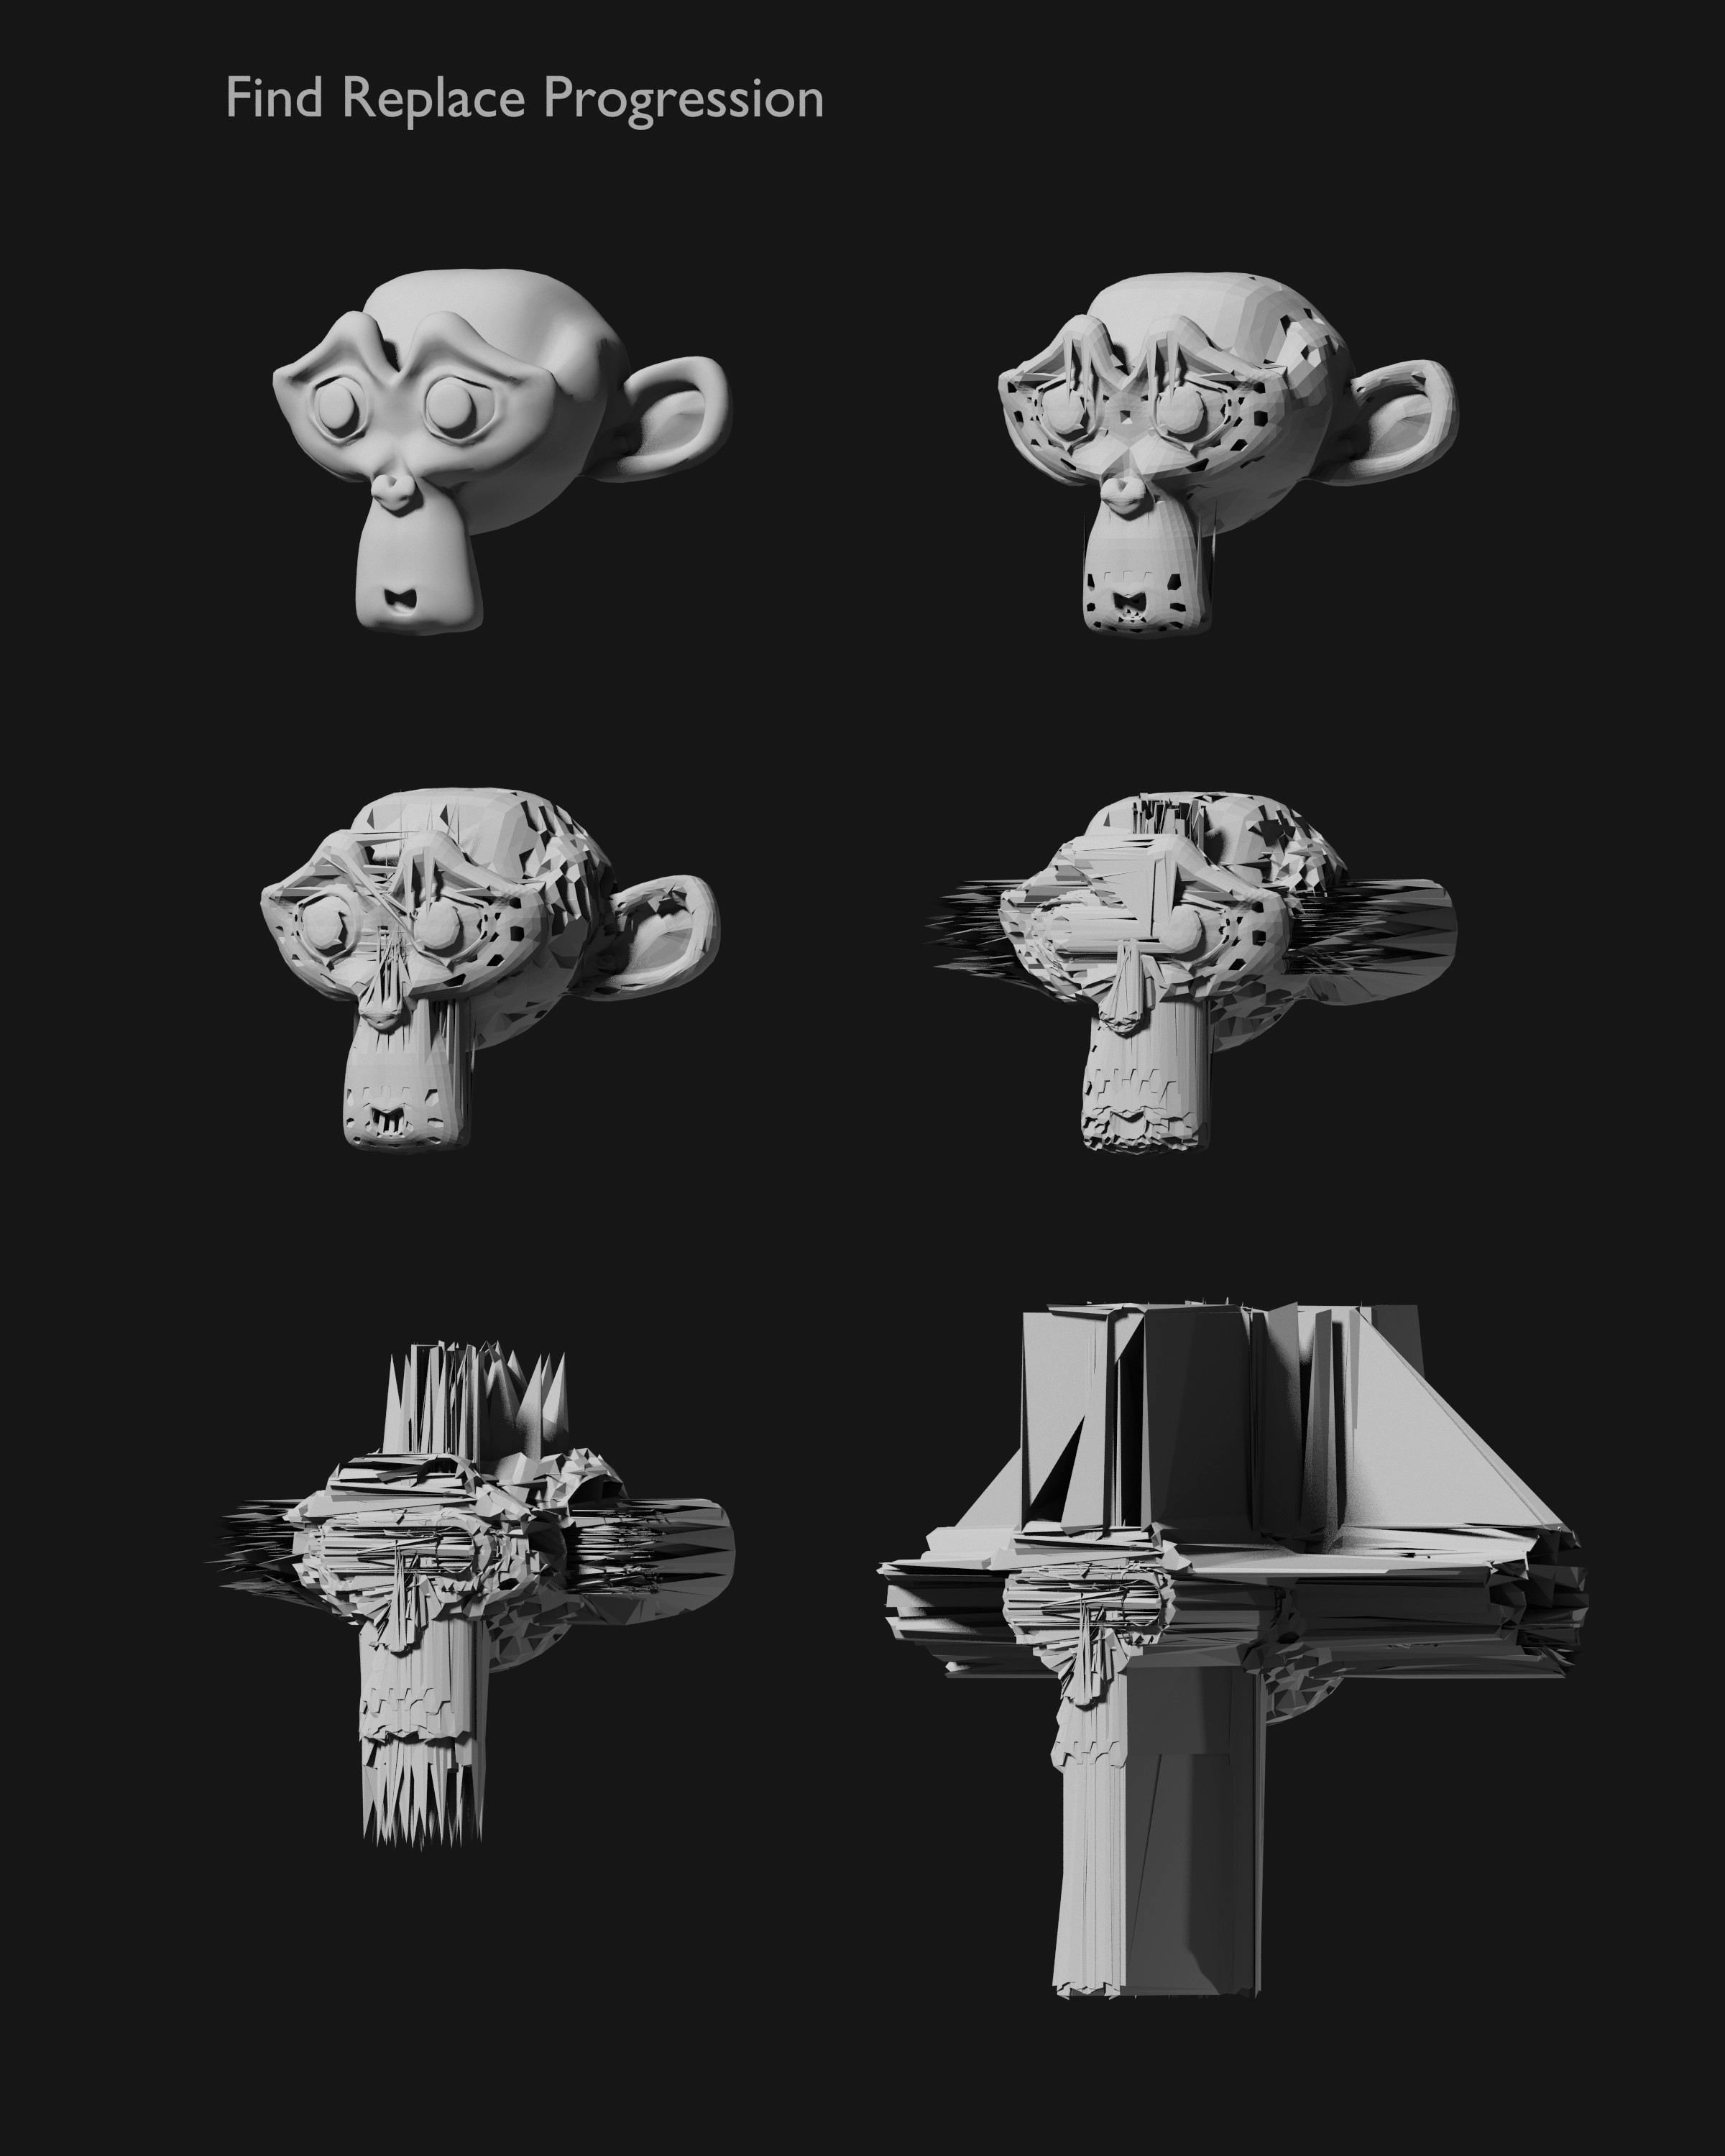
Finding and replacing integers within the lines will have an effect.. but you must be careful! This is where you are more likely to make the file unreadable… be sure that the result of your “find and replace” is not a reference to a vertex that does not exist. Recall that the vertices are indicated by their index number. If you have 1000 vertices and you replace “1” with “9”, you’ll end up with a reference to a non-existent vertex at position 9000. You should be safe if you always replace a larger number with a smaller number. (This is an area where a more intelligent script would be useful.. but that’s a topic for another day..) Here’s an example of finding and replacing the data in the “faces” section of the file.. as before, there’s a progression from fairly limited to more drastic replacements.
Obviously, one can combine all three of these techniques when “glitching” the file.
There are more advanced methods. In Blender one can specify a vertex that will be the starting point for sorting the vertices. Thus one could force the vertices at the tip of Suzanne’s nose to come at the start of the list. This allows some control of where the glitching will take place. If one knows that the nose of the figure is at the beginning of the list, one could avoid changing data in that area if the object was to preserve the original form of the nose.
Now that you’ve finished this first section, move on the the second set of notes, here.