As with the earlier notes, this will make more sense if you have some prior knowledge of 3d modeling and rendering (and, in this case, texture mapping). A knowledge of Blender will be especially useful. Hopefully you can make the necessary adjustments if you use a different 3d modeling and rendering application. It’s assumed that you’ve gone through the previous notes in this series, starting here .
So far I’ve discussed glitching the 3d vertices of a model described in an .obj file. These vertices define the object’s surface in 3d space. However, the file can also contain a list of texture vertices, sometimes referred to as UV vertices. These allow a 2d image to be mapped to a 3d surface in the same way that a Mercator projection map corresponds to a globe, or the way the flattened, peeled skin of an orange can be fitted back onto the orange.
In this note I’ll discuss the first of several approaches to “glitching” the way a texture is mapped to a 3d object. This first method hews more closely to the original glitch esthetic in that the results are mostly a matter of chance. We’ll open an .obj file, cut and paste, find and replace, and discover afterwards what the effects are.
Something else that will be different about this set of notes: Instead of working with a mesh that is fully rounded – a model of a head, for example – I’ll use a flat mesh and show how the final product of this method of glitching can be another 2d image. However, everything I explain here applies equally to the texturing of 3d models of the more usual, fully rounded type.
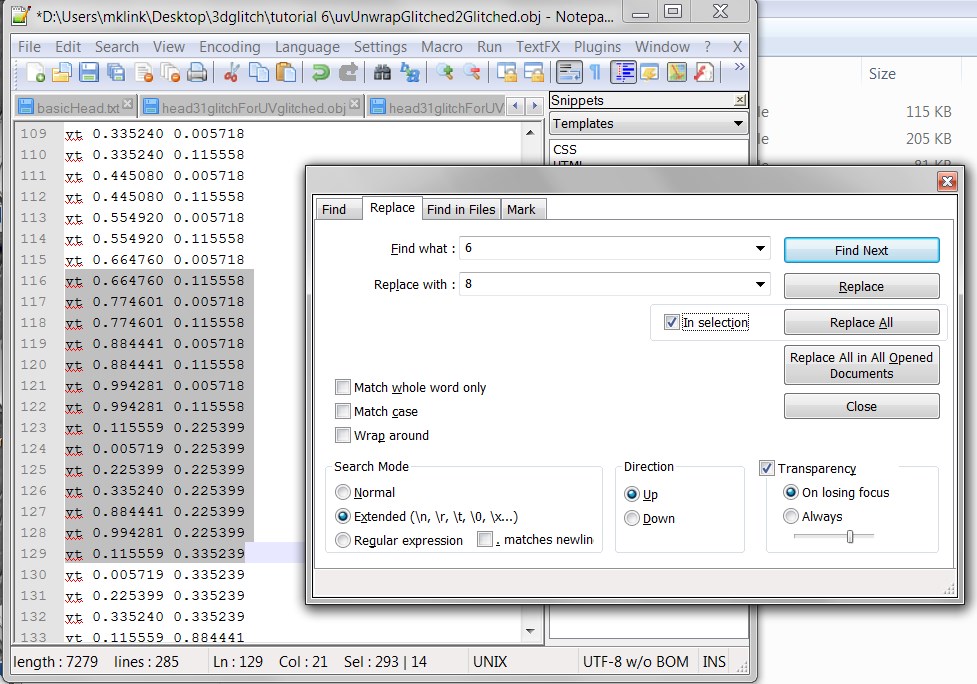
I won’t go into the technical details of the structure of an .obj file or how the texture mapping takes place.. all that is available on the web and has been discussed to some degree in the previous notes. For now, just know that the texture vertices in an object file are on the lines that begin with the characters “vt”.
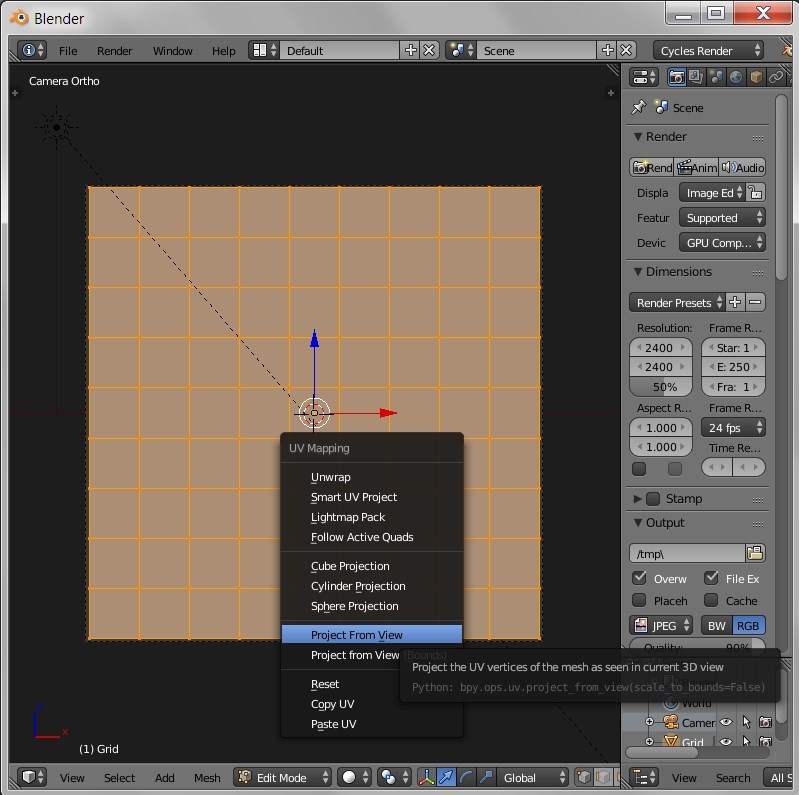
Our first job is to obtain an .obj file with texture vertices. In Blender, we create a 2d grid, set up an orthographic camera, and align it so the camera view is perpendicular to and facing the grid. We then go into “Edit” mode, select all the vertices of the grid, and hit the “u” key on the keyboard (stands for “unwrap”). From the available choices, pick “Project from View”. That’s it.
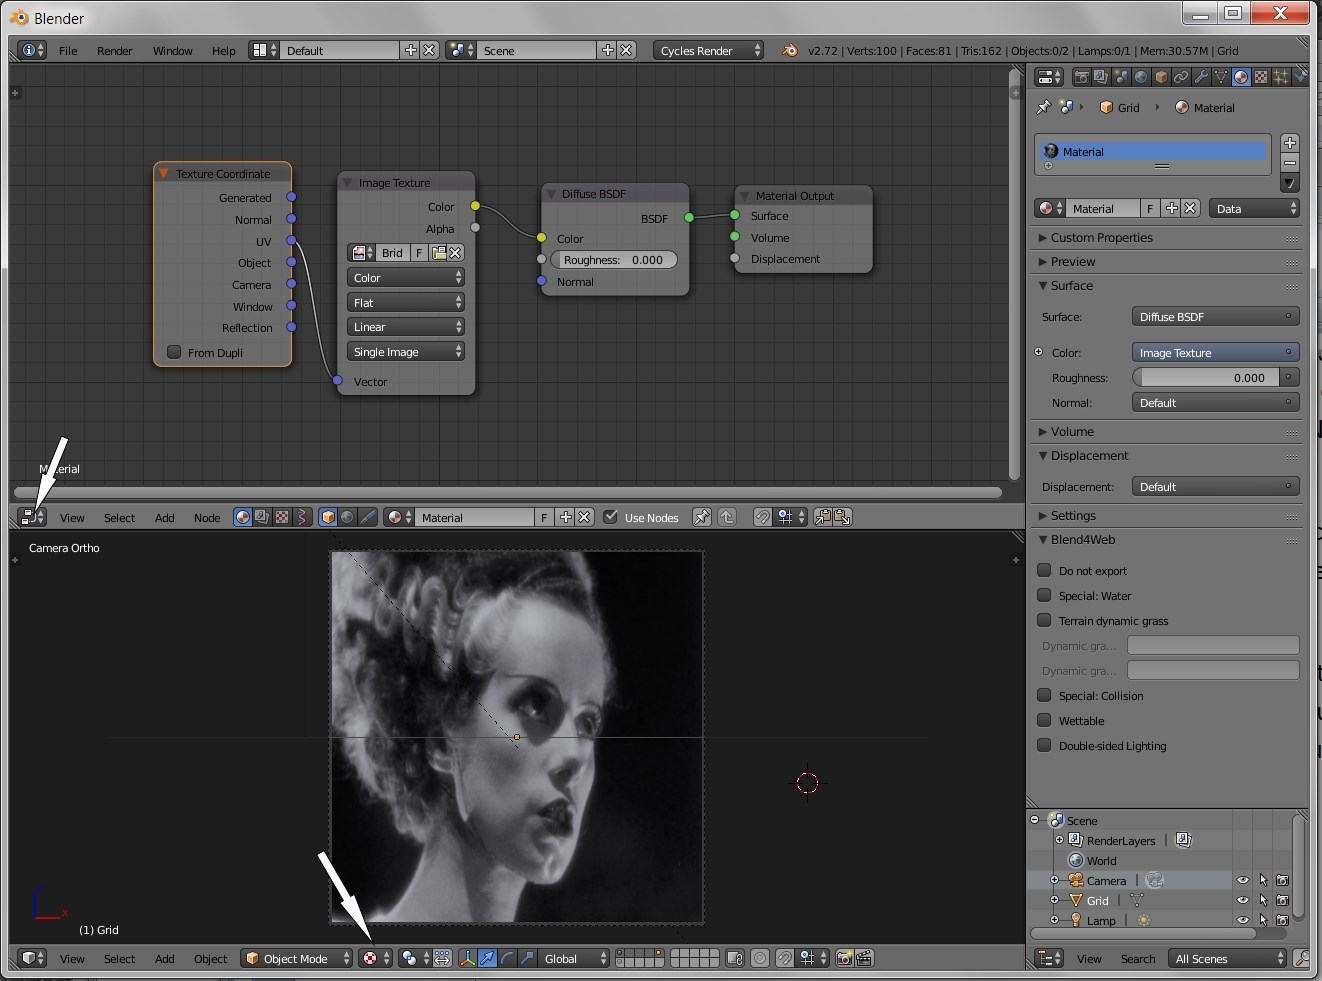
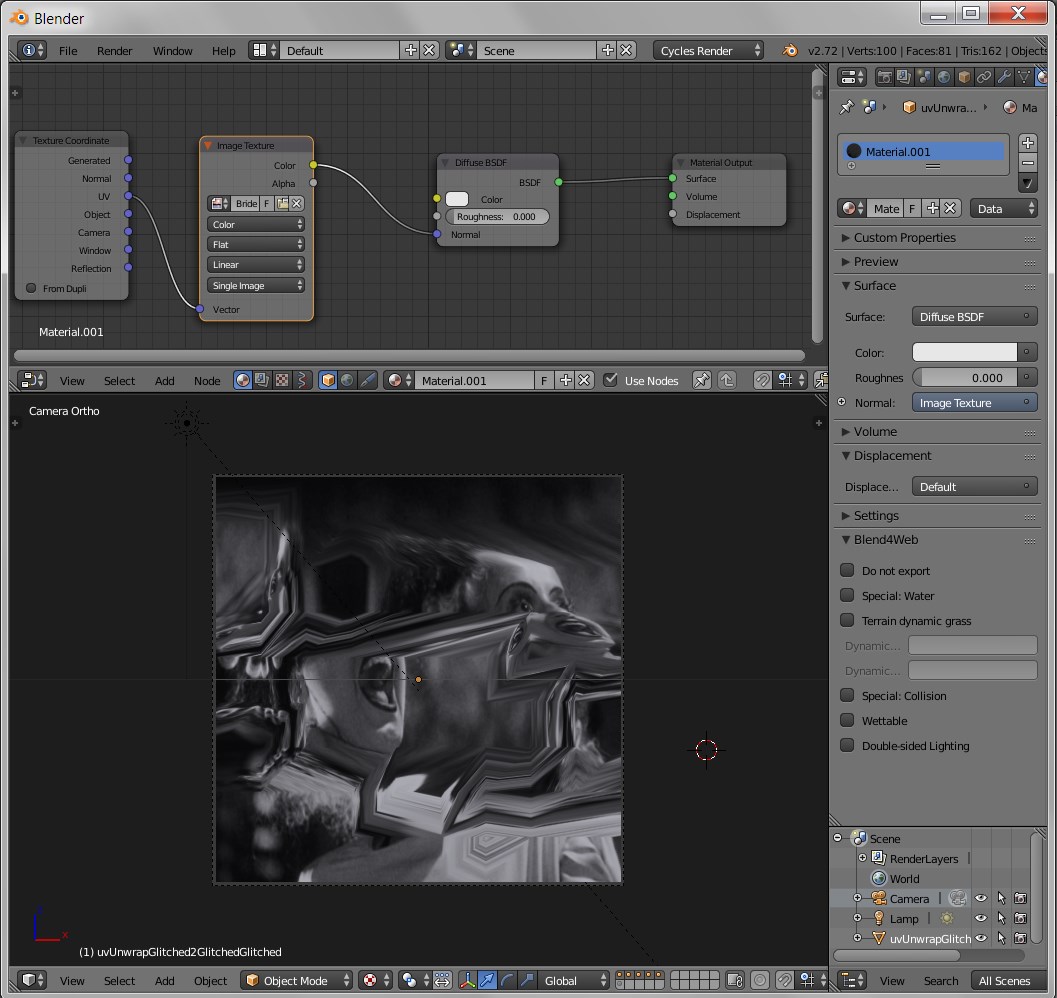
Let’s look at the image before it is glitched. Assign the image to the grid as a texture. I’ll go into a little more detail about the process later, but the following screenshot shows the node setup (please note.. we are using the Cycles renderer here, not Blender Internal!). Be sure to set the display view of the 3d pane to rendered or textured. Otherwise you’ll only see the plain, untextured grid. Mrs. Frankenstein is a little distorted here since she’s been mapped to a perfect square.
One more thing before we export our grid as an .obj file, let’s look at the UV vertices we just created. Go into “Edit” mode, select all the 3d vertices of the grid, then switch one of the panes to the “UV Image Editor”. You should see another grid that looks just like the 3d grid. To begin with, each of the UV vertices matches the position of it’s corresponding 3d vertex.

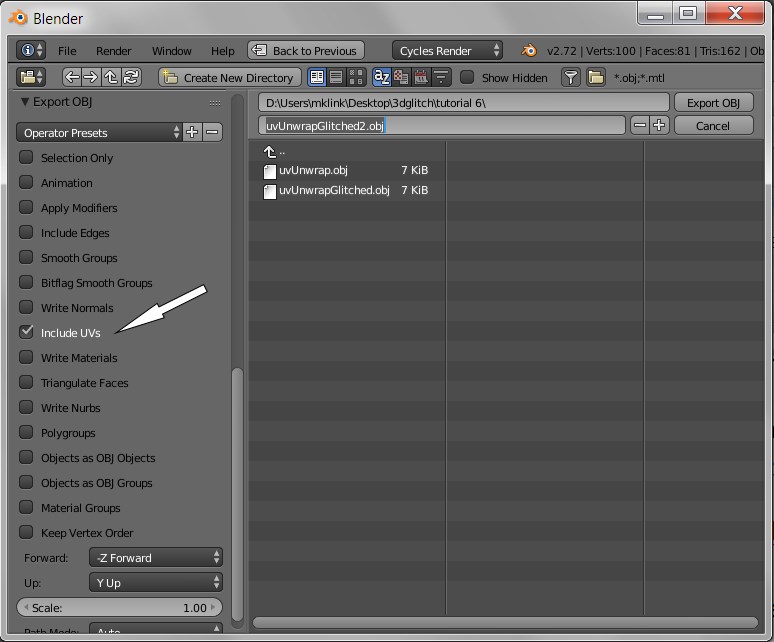
Next, export the grid as an .obj file as has been discussed in the earlier notes. Among the export options, be sure to check “Include UVs”.
Next, open the resulting .obj file in a text editor or spreadsheet, again as described in the preceding notes. Go to the section with the lines beginning with “vt”, cut, paste, find and replace, while making sure that the total number of lines in the section remains the same.
When you’re done and have saved your work, go back to Blender, import the glitched .obj file, and assign an image texture using the node system. The root node will be a Texture Coordinate node. Choose the “UV” feed. The next node will be a texture node. Choose “Image Texture” and load the image you want to map. The final node before the output will be a diffuse shader. Here, again, is a screenshot of the basic node setup.. Be sure to set the display mode of the 3d pane to textured or rendered: Notice how different Mrs. Frankenstein looks this time!
Let’s look at the UV vertices after the mangling they underwent while in the text editor. Go into Edit mode, select all the 3d vertices of the grid, and again switch one of the panes to the “UV Image Editor”
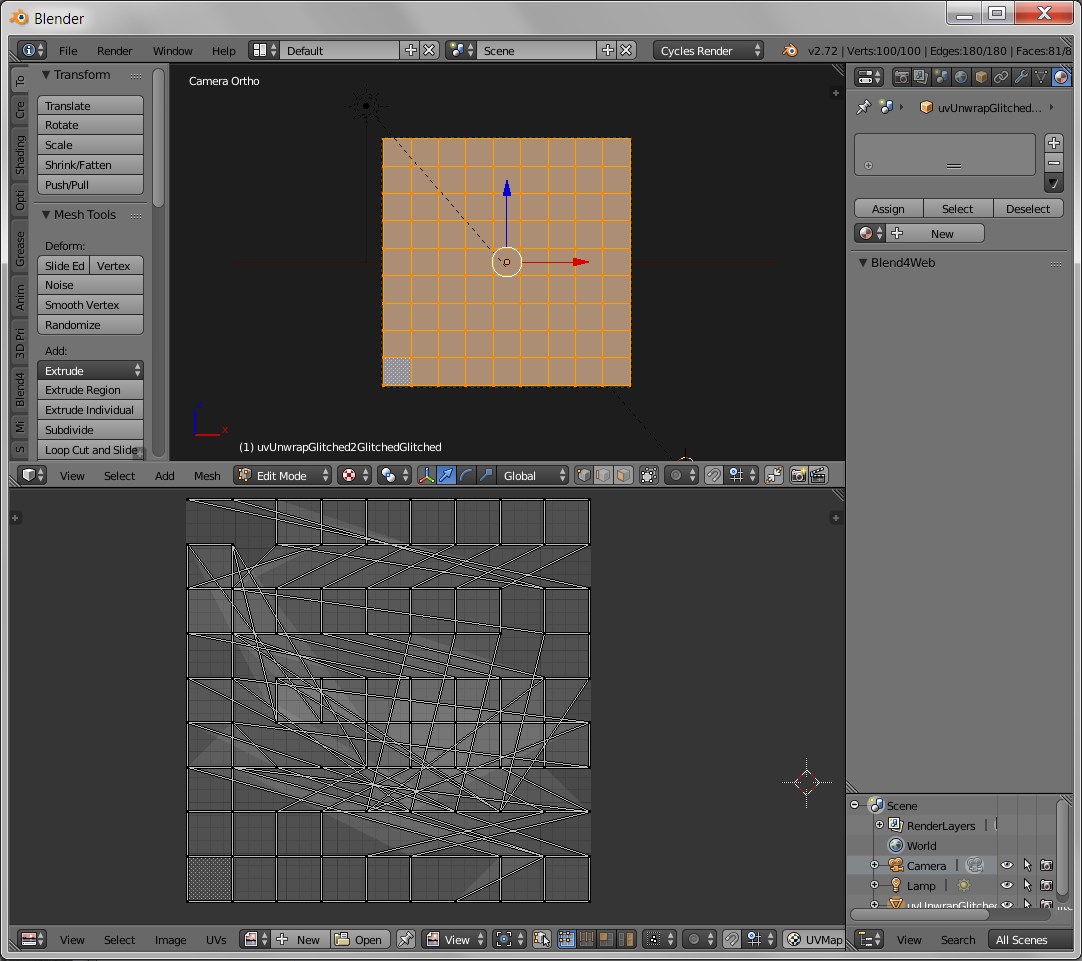
See how irregular the UV grid is now.. the mapping of the image has been thoroughly disrupted.
Note that the steps outlined above can be repeated until you are satisfied with the image. At that point you can do a final render as you would a normal 3d scene.

We’ve talked about how we can open the UV Image Editor and see the UVs. What we haven’t mentioned is that the UV coordinates can be directly manipulated in that editor, without going through the process of exporting to an .obj file for glitching.. that should give you a clue on how we can push this process further.